Ingredients
- 2 cups (230 g) blanched almonds, or 2 cups almond flour
- 1 cup (200 g) granulated sugar, plus more for dusting
- 2 tablespoons unsalted butter, melted
- 1/4 cup (60 ml) orange blossom water, plus more as needed
- 1/2 teaspoon ground cinnamon (optional)
- 1/4 teaspoon fine salt
- 2 1/4 cups (280 g) all-purpose flour, plus more for rolling
- 1/2 cup (115 g) unsalted butter, at room temperature
- 1/4 teaspoon salt
- 1/3 cup (80 ml) warm water, as needed
- Powdered sugar, for dusting
Instructions
Make the almond paste: pulse the blanched almonds and granulated sugar in a food processor until the almonds are ground to a fine, even powder. Add the melted butter, orange blossom water, cinnamon, and salt, and process until the mixture comes together into a smooth, pliable paste — it should hold a shape when pinched, without being sticky or oily. Wrap the paste in plastic wrap and chill it for 30 minutes; cold paste shapes much more cleanly.
Make the dough: rub the room-temperature butter into the flour and salt with your fingertips until the mixture looks like damp sand. Add the warm water a little at a time, kneading until a smooth, elastic ball forms — soft and pliable, not sticky. Knead for a full 8–10 minutes; the dough must be silky for the thin rolling ahead. Cover it with plastic wrap and rest for 30 minutes at room temperature.
Roll the dough paper-thin: divide the dough into 4 equal balls and work with one at a time, keeping the rest covered. On a well-floured surface, roll each ball into a long, very thin sheet — about 1 mm (1/16 inch) thick, thin enough that you can faintly see your hand through it. Dust with flour as needed so it never sticks, but brush off any excess before shaping.
Form the filling logs: divide the chilled almond paste into 4 logs roughly as long as your dough sheets and about 1/2 inch (1 cm) thick. Lay one log along the long edge of a dough sheet. Roll the dough over the log and press firmly with the flat of your hand to seal, then use the side of your hand to press the sealed strip into a slim, even crescent — the dough around the filling should be uniformly thin.
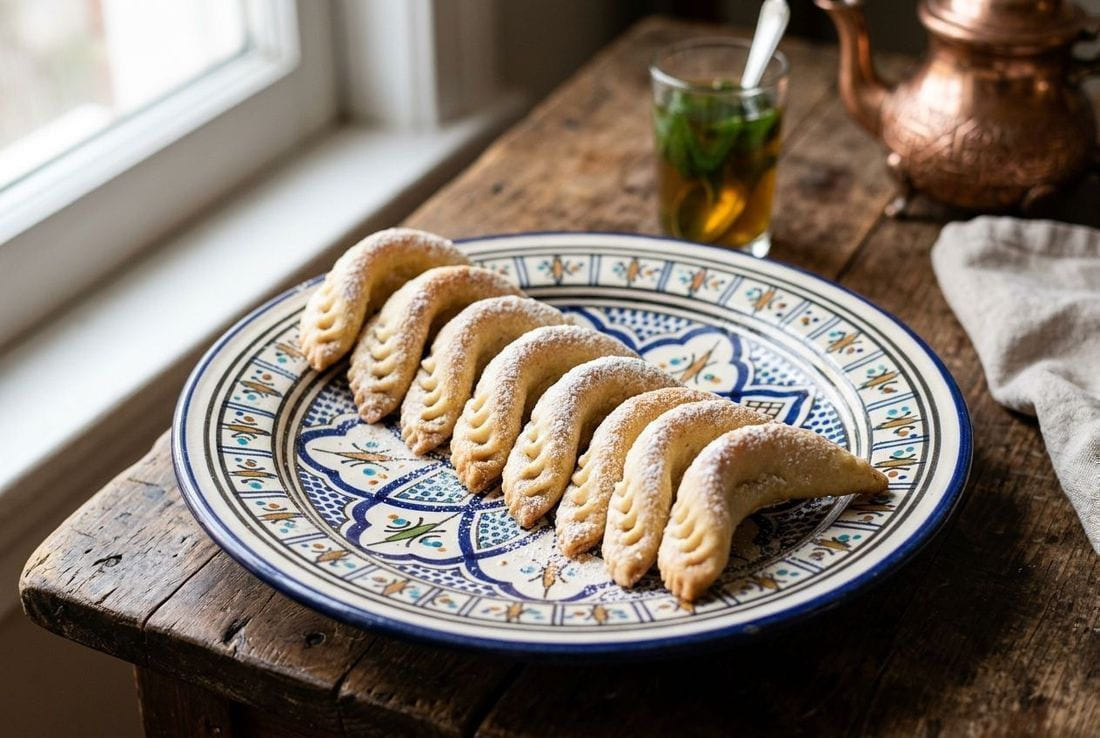
Shape the horns: cut the filled strip into 3-inch (8 cm) crescents with a sharp knife. Gently curve each piece into a crescent and pinch the two tapered ends, curling them inward slightly like a gazelle’s horn. Dip pastry tweezers — or the tines of a clean fork — in a little flour and press a decorative herringbone pattern across the back of each cookie, pressing lightly so you mark, not cut, the dough.
Bake: arrange the crescents on a parchment-lined baking sheet with a little space between them. Bake at 350°F (175°C) for 12–15 minutes, until the dough is set and just barely pale golden — the cookies should not brown at all; color means the delicate texture is gone. Let them cool completely on the sheet; they firm up as they cool.
Dust generously with powdered sugar and serve with mint tea. Store in an airtight tin at room temperature for up to 2 weeks — they keep beautifully and even improve for a day or two as the orange blossom scent settles.
Tips for Success
- The paper-thin dough is the whole game. A 1 mm sheet bakes into a crisp, shattering shell; a thick one bakes into a leaden pastry around a sweet center. Chill the filling, keep the dough covered between batches, and accept that the first few crescents may be ugly — by the end of the first sheet, the rhythm clicks.
- The almond paste must be pliable, not crumbly and not sticky. If it crumbles, add orange blossom water a teaspoon at a time; if it sticks to your hands, work in a little more ground almond. Chilling it for 30 minutes before shaping makes both problems disappear.
- Undercook rather than overcook. Kaab el ghazal should stay pale — pull them the moment the dough looks set and ever so slightly golden at the edges. They finish firming as they cool, and powdered sugar hides any unevenness while adding the snowy finish the cookie is known for.
Cook's Notes: what to watch for
- The pitfall: Letting them take color. Gazelle horns baked to golden are overdone — the shattering pastry texture exists only in the pale stage, so pull them the moment the dough looks set with barely a blush at the edges. Rolling the dough thicker than 1 mm gives a leaden shell.
- The step that matters most: Rolling the dough to a true 1 mm — thin enough to faintly see your hand through. The crisp shell that defines these crescents is entirely a function of that thickness, and it only happens with a well-kneaded, well-rested dough and a chilled filling.
- The quirk: They come off the sheet looking slightly soft and stay pale — they firm as they cool, so judge doneness by set dough, not color. And the almond paste should be pliable, not crumbly or sticky; chill it 30 minutes and both problems vanish.
Perfect pairings
These recipes belong on the same table — cook them together for a full spread, or swap in a variation next time.
Frequently Asked Questions
Why does my dough tear when I roll it?
Tearing usually means the dough is too dry or under-kneaded. Knead it for the full 8–10 minutes until it is silky, and add the water slowly — different flours drink differently; a shy extra half-teaspoon of water is often the fix. Keep the dough you are not rolling covered, because a dry skin tears instantly. If a sheet rips anyway, patch it with a scrap moistened with a drop of water and press firmly — the patch bakes invisible.
How do I get the classic striped look without pastry tweezers?
The tines of a clean fork dipped in flour do nearly the same job. Press the fork lightly across the back of each crescent in a herringbone pattern — the marks should read as texture, not cuts through the dough. Alternatively, the blunt back of a butter knife pressed at an angle makes a subtle ridge pattern. Dip whatever you use in flour before each cookie so the dough does not stick and drag.
My almond paste is crumbly (or too sticky) — how do I fix it?
Crumbly paste needs moisture: add orange blossom water a teaspoon at a time and process until it holds together when pinched. Sticky paste needs more body: work in additional ground almonds (or a spoon of the flour) until it releases your fingers. In both cases, chilling the paste 20–30 minutes before shaping makes it dramatically more cooperative — warm almond paste is the real culprit behind both symptoms.
My cookies cracked open in the oven and the filling oozed out — why?
A cracked seam is almost always a sealing or moisture problem. Press the dough firmly around the filling log with the flat of your hand so the two edges weld shut before you cut the crescents — a loose seam is the first place the paste escapes. The second culprit is a filling that is too wet: if the paste is sticky, chill it 20–30 minutes before shaping and work in a little more ground almond. And keep the logs slim — a 1/2-inch (1 cm) log wrapped in thin dough bakes clean, while a fat one splits the shell like an overstuffed dumpling.
How do I roll and lift paper-thin dough without it tearing?
Two tricks make thin dough manageable: roll between sheets of plastic wrap or greaseproof paper, and keep the unused dough covered at every moment — a drying sheet is a tearing sheet. If you are rolling on a floured board, slide a bench scraper or the dull edge of a knife under the sheet before lifting, and let it hang over your forearm rather than pinching it with fingertips. Work with one sheet at a time and reroll scraps at most once, gently: rerolled dough grows tough and tears on the second pass.
Why are my cookies tough and hard instead of tender and crisp?
Tough cookies come from overworked dough or an over-hot oven. Knead the dough only until it is smooth (8–10 minutes is plenty), avoid burying the sheet in extra flour while rolling — brush the excess off before folding — and do not reroll scraps repeatedly; each reroll develops more gluten. Bake at 350°F (175°C) and pull the cookies the moment they are set and barely pale; an oven that runs hot browns the butter and turns the delicate shell into a hard biscuit. If yours still bake firm, they are far from lost: they keep beautifully and soften slightly over a day in an airtight tin.
Affiliate disclosure: this page contains affiliate links. If you buy equipment through them, Cuisinety earns a small commission at no extra cost to you — it keeps the site free. Picks follow the same research-backed standards as our gear guides. Read ourfull affiliate disclosure.
Browse Moroccan Recipes →
Love this recipe? Pin it!
Save it to your Pinterest board so you can find it later.
Pin this Recipe Cuisine